Error : "The required feature is not enabled for this column type"
You also do not see the Term Store Management link in site collection settings.
If you are using SharePoint 2010, and you have the Managed Meta Data service application you have to associate the service with your Web Application before you can use it.
Even though you might have followed a step by step guide, something went wrong and you recieve the following errors :
"The required feature is not enabled for this column type"
If you do come accoss this error, no worries, you will just have to activate this feature manually using the STSADM command line utility, found at "C:\Program Files\Common Files\Microsoft Shared\Web Server Extensions\14\BIN"
You will have to run the following commands "stsadm -o activatefeature -id 7201d6a4-a5d3-49a1-8c19-19c4bac6e668 -url web application url -force".
I have found the id by looking in the following folder "C:\Program Files\Common Files\Microsoft Shared\Web Server Extensions\14\TEMPLATE\FEATURES\MetaDataNav" and examing the "feature.xml" file.
And also run "stsadm -o activatefeature -id 73EF14B1-13A9-416b-A9B5-ECECA2B0604C -url web application url -force".
I have found the id by looking in the following folder "C:\Program Files\Common Files\Microsoft Shared\Web Server Extensions\14\TEMPLATE\FEATURES\TaxonomyFieldAdded" and examing the "feature.xml" file.
This did the trick for me, hope that it did for you.
Tuesday, August 24, 2010
Monday, August 23, 2010
Office Web Applications Error
Word Web App cannot open this document due to an unknown error. If the problem persists, try opening the file in Microsoft Word.
Problem : This error usually occurs when you have not configured the service applications after you have installed the office web application package on your SharePoint Farm.
Resolution : Log into your SharePoint Central Administration site, navigate to your service application pages and create a service application for Word, PowerPoint and Excel. Once complete perform a IISRESET (not necessary) and try and re-open your document using Office Web Applications.
I hope this resolution has worked for you as it worked for me.
Monday, August 16, 2010
Execute SharePoint Timer Job using STSADM
Executing SharePoint schdeuled timer jobs is pretty simple.
If you have a scenario where you need all scheduled jobs to be run immediately you can use STSADM.EXE utility to achieve this by using the following command:
STSADM -O -EXECADMSVCJOBS
If you want to run a specific timer job you can use the following command:
STSADM -O RUNTIMERJOB -NAME (NAME OF TIMER JOB) -URL (SITE COLLECTION URL)
If you require any other information on STSADM commands you can check this link for a full list of available commands for STSADM command line utility.
Thursday, August 5, 2010
Managing Hyper V using Windows 7
It's been a while since the last post, hope this one can help someone out there.
In short I have been trying to manage my hyper v machines directly from my windows 7 machine. All you need to do is follow these easy steps.
Down and install microsoft kb update found here.
Once installed navigate to add remove windows features found at control panel, and expand the Remote Server Administration Tools, and select Hyper V Tools, shown below:
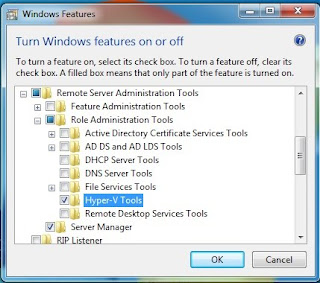
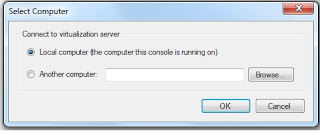
Click the ok button and Hyper-V remote adminsitration tool will be installed on the client computer, you are now able to connect to your Windows Server R2 installation running the Hyper-V management console.
Hope that this helped you, it sure helped me.
In short I have been trying to manage my hyper v machines directly from my windows 7 machine. All you need to do is follow these easy steps.
Down and install microsoft kb update found here.
Once installed navigate to add remove windows features found at control panel, and expand the Remote Server Administration Tools, and select Hyper V Tools, shown below:

Click the ok button and Hyper-V remote adminsitration tool will be installed on the client computer, you are now able to connect to your Windows Server R2 installation running the Hyper-V management console.

Hope that this helped you, it sure helped me.
Tuesday, July 27, 2010
Adding Event Reciever Programmatically
I was wondering one evening how would you programmatically add an event reciever to a SharePoint list programmatically, and then it hit me.
Get the Event Reciever collection for the specific list and just add your own event reciever to that collection, as shown below:
SPEventReceiverDefinitionCollection eventRecievers = spRequestList.EventReceivers;
SPEventReceiverDefinition defFile = spRequestList.EventReceivers.Add();
defFile.Name = "Auto Provisioning - Mark Parker";
defFile.Type = SPEventReceiverType.ItemAdded;
defFile.SequenceNumber = 10000;
defFile.Assembly = "SP2010.MarkParker, Version, Culture, PublicKeyToken=";
defFile.Class = "SP2010.MarkParker.EventReciever";
defFile.Update();
spRequestList.Update();
I have now added the Item added event to the list in question. If you wish to add the any other event recievers to the list simply follow the same method and just change the Type of event.
Hope this helped you
Programmatically Adding SharePoint List
Adding list programmatically is pretty simple, all you need to do is grab the list collection for the current site and add a new list as shown below:
SPListCollection ListCollection = _spweb.Lists;
ListCollection.Add("Name", "Decription", SPListTemplateType.GenericList);
Its that simple you have just added a list called name with the description description to your sharepoint site.
SPListCollection ListCollection = _spweb.Lists;
ListCollection.Add("Name", "Decription", SPListTemplateType.GenericList);
Its that simple you have just added a list called name with the description description to your sharepoint site.
Friday, July 23, 2010
SharePoint People Picker
Have you ever wondered if you can retrieve data like email, job title, etc, from the people picker control in SharePoint using Javascript? In short, yes it can be done and it is pretty simple.
Below is some javascript which accepts a parameter for the the position of the control, and returns the desired value.
function getEmailFromPoeplePicker(identifier)
{
var tags = document.getElementsByTagName('DIV');
for (var i = 0; i < tags.length; i++)
{
var tempString = tags[i].id;
if ((tempString.indexOf(identifier) > 0) && (tempString.indexOf('UserField_upLevelDiv') > 0))
{
var pplHTML = tags[i].innerHTML;
var valReturn = pplHTML.indexOf(">Email");
if (valReturn > 0)
{
pplHTML = pplHTML.substr(valReturn + 12);
var ValuePos1 = pplHTML.indexOf(">");
var ValuePos2 = pplHTML.indexOf("");
if (ValuePos1 > 0 && ValuePos2 > ValuePos1)
return (pplHTML.substring(ValuePos1 + 1, ValuePos2));
}
}
}
return null;
}
if you wish to return any other details from the people picker simply modify this line :
pplHTML = pplHTML.substr(valReturn + 12);
Change the substr value of 12 to the following :
29 For the mobile number
12 Gets the Job Title
This is only 3 of many examples of how it can be done, feel free to comment if you have found a better way.
Subscribe to:
Posts (Atom)